Transporter Magazine Volkswagen Vans Volkswagen Vans Tin Tops High Tops Westfalia and More
Vanagon Waterboxer Bottom O‑Ring Replacement (1.9/2.1 WBX)
A practical, engine‑in guide to replacing the cylinder base seals (aka bottom O‑rings) on Volkswagen’s 1.9 and 2.1‑liter waterboxer engines—complete with real‑world tricks, tool picks, and post‑repair troubleshooting.
Why this tiny O‑ring matters
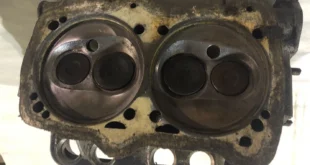
On Volkswagen’s 1.9 and 2.1‑liter waterboxer (WBX) engines, each cylinder liner—often called a jug—passes through the crankcase water jacket. At the case mouth, two small O‑rings per cylinder keep coolant out of the crankcase. These bottom O‑rings flatten and harden with age. Once they lose elasticity coolant can track past the case and jug seal and either seep externally, aerate the cooling system, or—worst case—contaminate the engine oil. Ignore it long enough and you’ll ruin bearings.
Symptoms of failing cylinder base O‑rings
- External coolant crust (white/green deposits) around the case spigots or under the pushrod tubes.
- Unexplained coolant loss with no obvious hose or radiator leak.
- Pressurizing/“burping” cooling system from air ingestion at the case joint.
- Milky oil or a rising oil level—shut it down immediately; bearings are at risk.
- Persistent coolant smell after long drives or overnight parking.
Can you do it with the engine in the van?
Yes. For many owners, an engine‑in head reseal with fresh bottom O‑rings is the sweet spot between a roadside fix and pulling the long block. You’ll spend more time than torque—patience is your best tool. The keys are cleanliness and piston jug support..
Fitment and parts overview
- Engines: 1.9 WBX (DH/DG) and 2.1 WBX (MV/DJ and regional variants)
- Per cylinder: two small bottom O‑rings (eight total)
- Also recommended: head gasket kit (water jacket seals, fire rings, stud seals), pushrod tube seals, exhaust gaskets, fresh coolant
- Material: quality purpose made O‑rings for hot‑coolant service (avoid generic O rings)
Tools & supplies
Core Tools
- Lamb’s‑crook pick to reach into the jug lip
- Long hemostats (straight/curved) for brittle O‑ring fragments
- Plastic/wooden O‑ring picks (avoid gouging aluminum)
- Piston supports or zip ties on the studs to hold jugs
- Brake cleaner or alcohol, lint‑free rags
- Silicone grease or engine oil safe for EPDM/Viton (or a dab of coolant)
- Coolant drain pan, funnels, hose pinch‑off clamps
Budget: 12″ locking hemostats
Tip: Avoid petroleum greases on coolant O‑rings. Stick with silicone paste or fresh coolant as assembly lube.
Step‑by‑step: replacing the bottom O‑rings (engine‑in)
Ease the jug back—keep the piston in
With the piston supported draw the cylinder liner back 2–3 inches. You’ll feel it unseat from the O‑rings. Watch the ring lands—rings must remain inside the bore. If a ring peeks out, stop and push the jug forward slightly. DO NOT PULL THE JUG PAST THE RINGS OR IT IS ENGINE OUT!
Find the O‑rings under the jug lip
Feel for the shallow groove just under the cylinder’s lip at the case spigot. On many engines, the O‑rings are so hard they look like metal.
Pro trick Use a lamb’s‑crook pick to snag the O‑ring. If it breaks try to catch an end with long hemostats and peel it out piece by piece. Patience beats force—don’t gouge the aluminum.
Clean the sealing surfaces
With the old rings out, clean the groove and case spigot thoroughly. Aim for smooth, bright aluminum with no RTV, corrosion nodules, or rubber residue.
Inspect for pitting or damage
Minor pitting can be smoothed with a light Scotch‑Brite touch. Severe corrosion may require epoxy repair or machine work, but most runners just need elbow grease.
Lubricate and install new O‑rings
Lightly coat the new rings with silicone grease (O‑ring safe) or fresh coolant. Seat them evenly in the groove under the jug lip (some kits specify the case groove—follow your kit; the goal is two fresh seals per cylinder). Ensure rings aren’t twisted. You will be using the black o-ring that most kits come with for the bottom of the cylinder sleeve in this instance.
Reseat the jug squarely
Guide the cylinder home square to the case. The O‑rings should compress smoothly. If you feel a hard stop or extrusion, back off, re‑lube, and try again.
Rebuild the head assembly
Once you have the black lower o ring installed you can continue on with your head replacement. Use a recently calibrated torque non click torque wrench and follow your service manual.
Button up & bleed the cooling system
Reinstall pushrod tubes with fresh seals, refit exhaust, and reconnect hoses. Refill with the correct coolant mix. Follow the Vanagon bleed procedure (front heater valve open, rear raised, bleed at radiator and thermostat housing) until you have steady heat and no bubbles.
Common mistakes (and how to avoid them)
- Smearing RTV at the cylinder base: the O‑rings seal by compression; silicone can cause extrusion and leaks.
- Letting the piston follow the jug: ring expansion can force a full piston reinstall. Keep it supported.
- Dirty grooves: a tiny RTV ridge or corrosion pit can create a capillary leak path.
- Skipping a head reseal after moving a jug: disturbed fire/water seals may fail later.
Time, cost, and difficulty
- Difficulty: Intermediate DIY
- Time: ~1 long day for one side engine‑in; a weekend for both sides with head reseal
- Parts cost: US$50–$200 for base O‑rings and head kit; more if adding pushrod tube seals, exhaust hardware, coolant, and tools
Troubleshooting after the job
- Weeping at the base after a few heat cycles: verify there is no leaking of coolant around the head gasket area.
- Persistent aeration: confirm proper bleeding, thermostat function, and radiator cap integrity. Pressure‑test the system.
- Milky oil: stop immediately. Troubleshoot for coolant in the oil.
Photo shot list & alt text


Reader Responsibility & Compliance (Global)
This is an enthusiast guide produced for an international audience. Do your own research: confirm procedures, torque values, and parts in your factory service manual and with reputable, current sources. Vehicles differ by market and year; comply with your local workshop practices, environmental rules (e.g., coolant handling/disposal), and roadworthiness regulations. You are responsible for your own work and decisions.
Closing thoughts
Replacing the bottom O‑ring gaskets on a Vanagon waterboxer rewards careful technique. The trick is knowing where the seals live—tucked in that subtle groove under the jug lip—and using the right tools to coax them out without scarring the aluminum. With fresh O‑rings, clean surfaces, and a properly bled cooling system, your WBX will be dry, quiet, and road‑ready for the miles ahead.
FAQ
Do 1.9 and 2.1 WBX use the same bottom O‑rings?
The concept is the same—two small O‑rings seal each cylinder at the base. Kits may differ by supplier; verify fitment for your engine code.
Can I replace just one cylinder’s O‑rings?
You can, but if one is cooked, the others aren’t far behind. Doing all four while you’re there is inexpensive insurance.
What lubricant should I use on new O‑rings?
Use silicone grease suitable for EPDM/Viton or a smear of fresh coolant. Avoid petroleum greases.
What happens if the bottom O‑rings are missing?
Expect leaks: external weeps, air ingestion, or coolant in oil. The WBX relies on them; leaving them out invites failure.