 Transporter Magazine Volkswagen Vans Volkswagen Vans Tin Tops High Tops Westfalia and More
Mechanical • DIY
Freeing Stuck VW Cylinder Sleeves & Heads: A Shop‑Proven Guide (Air‑Cooled & Waterboxer)
When the jugs are practically welded to the head: how to separate them cleanly with a rounded tire bar, wedges, and a little thermal advantage—without pulling a cylinder off a piston.
By Transporter Magazine Tech Desk •
In This Guide
- Why They Stick (and Which Engines Are Worst)
- Safety First, Engine Second
- Tools That Make This Easy
- The Golden Rule: Lock the Cylinders Down
- Method A: Air‑Cooled Head That Won’t Let Go
- Method B: Waterboxer Head That’s Glued to the Liners
- Clean‑Up & Inspection
- Common Mistakes to Avoid
- Preventing the Problem Next Time
- Step‑By‑Step Summary
- Recommended Gear
- FAQs
Why They Stick (and Which Engines Are Worst)
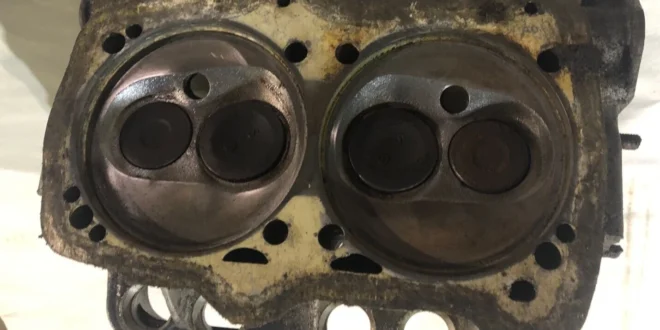
Air‑cooled (Type 1/Type 4, incl. air‑cooled Vanagon) — The cast‑iron cylinder top land (spigot) registers into the aluminum head’s counterbore (head register), and over decades the two can “bite” together. Add a slight combustion leak or an overheated episode and you get carbon glazing that acts like glue. A head that’s been leaking will almost always be the most stubborn.
Waterboxer (1.9/2.1 Vanagon) — The aluminum head clamps over steel cylinder sleeves with coolant seals. Electrolysis, corrosion, and seepage create white crusts and rust that lock sleeves to the head. WBX heads often resist evenly all the way around; when they finally move, they go with a pop.
Important Risk on Both Engine Families
If a cylinder slides off the piston and the rings spring out, you’ve turned a stuck‑head job into an engine‑out job. Your mission is to free the head from the cylinder without letting the cylinder lift off the piston.
Safety First, Engine Second
- Disconnect the battery and isolate ignition sources.
- Drain coolant on WBX engines before exposing the water jacket.
- Support the engine securely. If it’s in the van, use a stable support bar or a jack with a wood block under the case—never the exhaust.
- Work clean. Dirt and grit falling into open bores or oil galleys will haunt you later.
- Wear eye protection—flakes of carbon and oxide will fall.
Tools That Make This Easy (and Safer)
Editor’s Pick
Long Tire Spoon / Tire Bar
Rounded, polished tip (24–27”) gives controlled leverage without gouging aluminum. Place between head studs and lever against the jug tabs, not the fins.
Best Budget
Penetrating Oil (PB Blaster / Liquid Wrench)
Cheap, available, creeps into micro‑gaps. Apply, wait, re‑apply right before leveraging.
Worth the Splurge
Kano Kroil
Exceptional capillary action for stubborn, carbon‑locked interfaces.
Consumables you’ll want on hand: blue shop towels, Scotch‑Brite pads, razor scraper, brake cleaner, copper anti‑seize (air‑cooled spigot only), silicone grease for WBX o‑rings, and new sealing rings/gaskets.
The Golden Rule: Lock the Cylinders Down
Before you even loosen the last head nut, install cylinder retainers so the jugs can’t creep off the pistons:
- Slip large fender washers over the studs and snug them with nuts against the cylinder flanges. On air‑cooled, two studs per cylinder is usually plenty; on WBX, use retainers that hold the sleeves tight to the case.
- Short sections of tubing/spacers with washers make great compact clamps.
- Do not rotate the crank while cylinders aren’t fully clamped—rotation tries to slide a cylinder and pop the rings.
Method A: Air‑Cooled Head That Won’t Let Go
1) Soak the seam
With rocker gear and head nuts off (keep head washers oriented), spray penetrating oil where the cylinder meets the head. Let capillary action work for 10–20 minutes. Re‑apply before levering.
2) Preload & rock (tire‑bar technique)
Slide the rounded tire spoon between two head studs and set the tip against the small tab or solid shoulder of the jug (never on fin tips, never on the head’s machined fire‑ring area). Apply modest pressure and rock the lever side‑to‑side, then move 30–60° around the circumference and repeat. Think wiggle and walk, not yank and twist.
Reader‑Proven Trick
Put the angled, smooth rounded tip of a long tire bar between the head bolts and lever against the tabs on the cylinder jugs, gently rocking back and forth. A small screwdriver as a pilot and a bigger one as a helper can scale the leverage—just avoid the fins.
3) Tap to talk
With gentle preload on the lever, use light taps from a dead‑blow on the side of the head casting (not the fins). The vibration helps penetrant creep and breaks oxide bridges.
4) Thermal advantage (optional but effective)
Warm the head with a heat gun in a 360° sweep around the spigot area—aim for ~60–90 °C (140–195 °F). If needed, hit the cylinder barrel only with freeze spray. Aluminum expands ~2× iron for the same temperature rise—use that differential.
5) Shim the gap
As soon as a hairline gap appears, insert a thin hardwood or plastic wedge. Keep walking the lever around the circle and grow the wedges as the gap opens. Avoid metal wedges unless you blunt and polish the edge.
6) Micro‑entry (last resort)
On heads with heavy carbon glazing, a very thin polished shim (feeler blade with rounded corners) can break the carbon ring—never drag edges across the head’s sealing surface.
7) Lift straight off
Once loose, lift the head off square. If one corner sticks, reverse the rock on that corner before pulling. Keep an eye on your cylinder retainers: if anything creeps, stop and re‑clamp.
Method B: Waterboxer Head That’s Glued to the Liners
1) Drain & prep
Drain coolant completely. Remove pushrods/tubes as required, loosen and remove head nuts, and install cylinder/sleeve retainers to keep the liners clamped to the case.
2) Penetrant around head registers (sleeve counterbores)
Target the head register (counterbore) where each steel sleeve enters the head. If there’s chalky white corrosion, gently pick away the bulk with plastic so the oil can creep.
3) Even, circular persuasion
Use the rounded tire spoon against robust points on the head casting near the head registers (counterbores) and push the head away from the sleeves in small, even steps around the circle. If there’s no movement, add gentle heat to the head only and refresh penetrant as it cools.
4) Opposed wedges
As a gap appears, insert two hardwood wedges on opposite sides to keep separation even; then work 90° away and repeat. The head is thin near the water jacket—keep loads light and distributed.
5) DIY head puller (optional)
Prefer straight‑line force? A simple puller plate using two or four head‑stud bores with spacers that push against the case lets nuts nudge the head out squarely. Turn each nut a tiny, equal amount and pause to re‑check sleeves and seals. If in doubt, stick with the lever‑and‑wedge method.
6) Keep sleeves home
If a sleeve tries to follow the head, stop and clamp it back down. If a sleeve lifts enough to disturb a base seal, plan on new base o‑rings and reseal work.
Clean‑Up & Inspection (Don’t Skip!)
- De‑carbon the head register (counterbore) and the cylinder top land (spigot) (where the two meet) with a razor scraper and Scotch‑Brite. Protect machined surfaces—aim for clean metal, not removed metal.
- Chase head‑stud threads on the case; clean nuts and washers.
- Check flatness across the head’s sealing band with a straightedge and feelers. Severe pitting or fretting may require machine work or replacement.
- Refresh seals:
- Air‑cooled: New copper/sealing rings per your spec. A whisper‑thin smear of copper anti‑seize on the cylinder spigot at the case can help next time—never on the head’s fire ring.
- WBX: New coolant o‑rings (water‑jacket and sealing rings) and a touch of silicone grease on o‑rings; keep lands clean and dry otherwise.
- Torque & pattern: Follow the exact model/year spec from the factory repair manual—values and sequences vary.
Common Mistakes That Make Things Worse
- Prying on fins or using sharp pry tools → bent fins and burrs that invite hotspots and leaks.
- Gouging the head’s fire ring or cylinder top → even tiny nicks can compromise sealing.
- Letting cylinders lift off pistons → hello ring compressor (and likely engine‑out).
- Torches on the head → localized, high heat can warp thin sections; use a controlled heat gun.
- Forgetting to clamp sleeves before you start → it only takes one accidental crank rotation.
Preventing the “Stuck Forever” Problem Next Time
- Fix small leaks early. Combustion or coolant seep accelerates corrosion and carbon locking.
- Moderate anti‑seize (air‑cooled spigot only). Don’t contaminate head sealing bands.
- Tighten to spec with clean threads and oiled nuts/washers when called for. Uneven clamping breeds hot spots and fretting.
- Keep the cooling system healthy (WBX). Fresh coolant and proper inhibitors slow galvanic welding steel–aluminum.
Step‑By‑Step Summary (Quick Reference)
- Clamp cylinders/sleeves to the case.
- Soak the head‑to‑cylinder seam with penetrant.
- Lever with a rounded tire spoon, gently, moving around the circle.
- Tap and thermally bias (warm aluminum head, cool iron sleeve) if needed.
- Insert wood/plastic wedges as the gap appears; work evenly.
- Keep jugs home—re‑tighten retainers if anything creeps.
- Lift head square and clean everything properly.
- Replace seals and reassemble using the correct torque pattern.
Recommended Gear
Editor’s Pick
Ken‑Tool / Motion Pro 24–27″ Rounded Tire Spoon
Gentle leverage, polished rounded tip for controlled separation.
Disclosure: Links above may be affiliate links. If you choose to buy, we may earn a small commission at no extra cost to you. Thanks for supporting the magazine.
FAQs
- Can I do this with the engine still in the van? Often, yes. Air‑cooled engines are easier on a stand, but savvy techs free stuck heads in‑vehicle. For WBX, in‑vehicle head service is common. Key: solid support and cylinder retainers before you start.
- How much heat is safe? Use a heat gun, not a torch. Aim for warm‑to‑hot by hand (~60–90 °C / 140–195 °F) on the head casting, uniformly around the spigot. If you smell baked oil or see discoloration, you’re overdoing it.
- What if a sleeve lifts off the piston anyway? Stop. You’ll need a ring compressor and perfect cleanliness to reseat it. Depending on space, that often means engine‑out. On WBX, plan to replace base o‑rings if a liner moves at the case.
- Should I use sealant on the head‑to‑cylinder area? No. Air‑cooled heads rely on clean metal‑to‑metal sealing at the fire ring; WBX uses o‑rings and a machined interface—follow factory procedure.
- How long should I wait after applying penetrant? Give it 10–20 minutes to creep, add a second application before you lever, and re‑apply as you work around.
Have a better trick for stuck heads? Send photos and a short write‑up for our Reader Rig spotlight. We love showcasing clever solutions that keep Transporters rolling.


You must be logged in to post a comment.