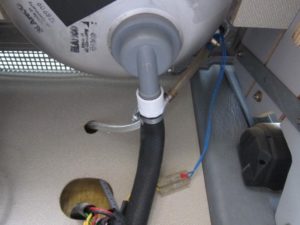
 Westfalia full campers come with a sink in the kitchen. Sometimes the kitchen sink drain system develops a leak. Stowing items underneath the sink in the cabinet or items shifting around while driving may also damage the plastic drain catch hanging down. If your sink drain is leaking it can be replaced in about 20 or 30 minutes depending on how detailed you want to get into. Less if you just replace the lower drain catch outlet.
Finding the proper fitting sink drain for the sink’s drain hole size as well as the waste hose isn’t a huge problem. Lots of RV’s and marine applications use the same fittings and hardware. There are several drains that will physically fit the sink’s 2-inch hole.

Some single parts are available for the drain system like the under sink trap and barb fitting and the floor drain with a cap that is made for a greywater tank underneath. If time or necessity dictates these only need replacing and not the whole system just replacing them may save you time and a few dollars. Assess the condition of the other components while you are working on the sink drain to see if anything else needs attention.
There is also a complete sink drain replacement and a partial sink drain replacement. The major difference being the upper strainer piece that you see when using the sink. Depending on what you need and how much upgrading you want to do these are a strong option. When doing something anyway it’s often better to spend a couple more dollars and replace everything so as not to worry about future problems.

There is also the possibility to use a space saver sink drain to reduce the risk of damaging the sink drain. This low profile sink drain tucks tightly to the bottom of the sink saving a great deal of the nearly 3 inches of space the original style sink drain and trap takes up.
Ambassador Marine makes a space saver drain replacement that will fit the Vanagon’s Westfalia kitchen sink 2-inch drain hole. It goes in easily and the stopper works well. To connect it to the waste drain you will need a PVC fitting with a female coupler with a 1-inch slip joint and the male end in a 3/4 inch pipe thread. Push the 1-inch female fitting over the barb tightly. The connection won’t leak without glue or sealant but using some ABS to PVC glue will not hurt and will make the connection stronger than it needs to be.
Replacing the parts should take less than half an hour provided you know where all your tools are and didn’t forget anything. You will need a pair of needle nose pliers and a Phillips head screwdriver. Take the door under the sink off by opening it and pulling upward on the hinges. Take the drawer out and place it out of the way also. If you are only replacing the underneath sink trap remove the hose and unscrew the upper and lower drain pieces. Place the needle nose pliers in the upper metal sink strainer to hold the upper drain while unscrewing the lower plastic trap piece.

Replacing the hose and plastic through body connector access is gained through a cover in the bottom of the cabinet. A false bottom steps up and covers this area. To remove this, take out the rubber stoppers surrounding the false bottom with the needle nose pliers carefully and pull out the false bottom cover.
If you are just replacing the hose do so and replace the cover. Underneath the outside of the van will be the plastic connector fasteners. There are two Phillips head screws that hold it in place. Remove the old one and install the new replacement. Make sure to screw the rubber keep to one of the screws for the drain cap so you don’t lose it. Tighten then snugly but don’t overtighten them as they are plastic.

The sink drain should have some kind of sealant between the sink and the pieces. Standard silicon will be sufficient and running a slight bead around the connecting surface’s parts before installation will be sufficient. Plumbers putty will also work by rolling out a thin strip and putting it between the sink and upper metal strainer. Tighten the two sink pieces together snugly using the needle nose pliers. Make sure the barb drain is facing the back in the proper angle to fit the drain tubing so it doesn’t kink.
Often times the sink backs up and the drain cap on the outside of the van underneath doesn’t get removed. If the sink doesn’t drain check out the cap underneath the van to see that it isn’t still closed. Westfalia and the RV drain, in general, is a simple system but over time can deteriorate or become damaged. With a few simple tools and a half hours time it can easily be brought back into perfect operating order.
 Transporter Magazine Volkswagen Vans Volkswagen Vans Tin Tops High Tops Westfalia and More


You must be logged in to post a comment.